Social Posting
Overview
Lead Liaison's social posting allows users to post to multiple social networks on behalf of multiple people at one time. Premier social networks are supported, specifically LinkedIn, Facebook and Twitter. Link click analytics to measure social network ROI and advanced scheduling (posting at future dates/times, the Buffer) capabilities are also included.
Adding Social Network Accounts
Social network accounts can be added in bulk by an Admin or individually by each user. To add a social network go to the "Connectors" section within Lead Liaison by doing the following:
- Click Settings > Integrations > Connectors
- A section for Facebook, Twitter and LinkedIn will appear

Adding a LinkedIn Company Page
To add a LinkedIn Company Page to Lead Liaison to post to your company page do the following:
- Add the LinkedIn account that is associated with your LinkedIn Company Page
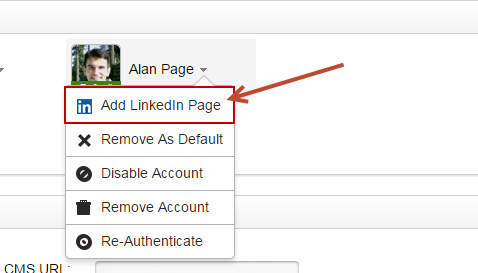
- Once the LinkedIn account has been added click on the account name to bring up the options menu as shown below
- Choose Add LinkedIn Page from the menu
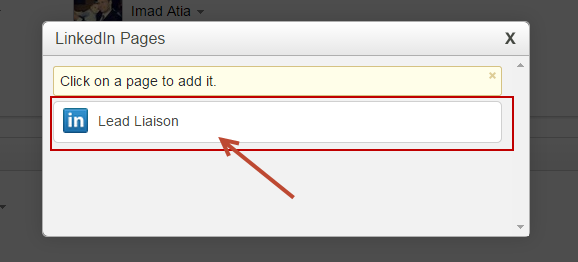
- If you have multiple LinkedIn Company Pages they will be displayed in the ensuing popup
- Select the LinkedIn Company Page you'd like to add
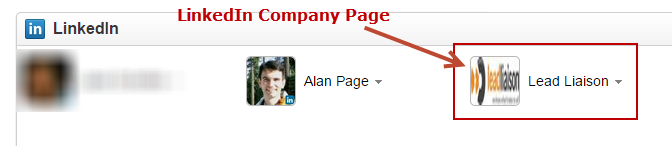
- Voila! Your LinkedIn Company Page will be added as a social account you can post to:
Adding Facebook Fan Pages
Due to the nature of Facebook's API, we cannot post to personal Facebook accounts. However, you will still need to connect your personal account for our system to access the Fan Page.
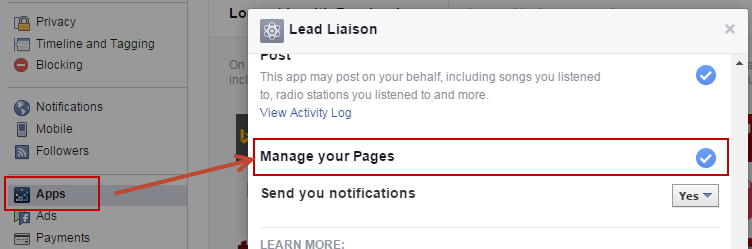
When adding a Facebook account to Lead Liaison there is a step that asks if you want to allow Lead Liaison to manage your Facebook pages. If that step is overlooked, this will prevent Lead Liaison from reading the pages. Fortunately, you can change this setting in your Facebook account at a later time by doing the following:
- Go to the "Apps" section in your Facebook account, https://www.facebook.com/settings?tab=applications, and search for the Lead Liaison app.
- The setting is called "Manage your Pages" and should be turned ON to allow Lead Liaison to manage your Fan pages.
Configuring Social Network Accounts
Each social network account can be individually configured. To configure an account click on the name of the social network account you'd like to configure. A drop down menu will appear similar to the one below:
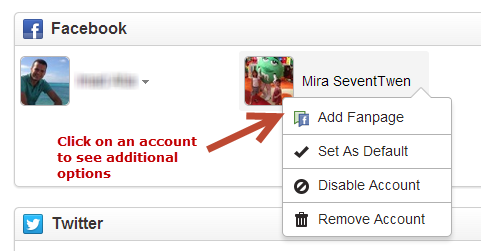
Settings are as follows:
- Add Fanpage (Facebook only) = Allows posting to Fanbook page on Facebook.
- Set As Default = Makes the social network a default account. Default accounts are automatically selected when creating a new social post message which eliminates the need to re-select accounts when posting multiple messages.
- Disable Account = Disables the account. Disabled accounts will not appear on the social post page.
- Remove Account = Removes the account from Lead Liaison.
- Re-Authenticate = Re-authenticate a social media account (for expired accounts).
Posting Messages
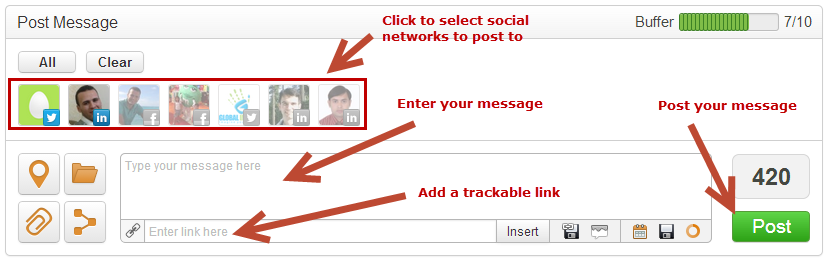
To post a single message on behalf of multiple social network accounts do the following:
- Click New > Social Post
- A section similar to the one below will appear
- Select the social media account you would like to post to by clicking the icon on top (default accounts are automatically selected). Greyed-out accounts are not selected.
- Type a message in the box that says "Type your message here".
- Optionally, to insert a website URL and have it automatically encoded using bit.ly and enabled for tracking within Lead Liaison enter the URL in the "Enter link here" box under the message box and click the "Insert" button.
- Click the green "Post" button.
Posting to LinkedIn
When posting messages to LinkedIn the message will take up to 1-2 minutes to show up. The message will be visible on the LinkedIn home page for the posting account under "Your Updates".
Character limits
The system will adjust the character limit based on which social media accounts are selected. The default is 1000 characters, but will adjust down to 240 characters if you select a Twitter account.
Settings for Posting Messages
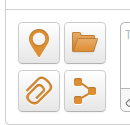
To set the Program/Campaign, use a Draft message, add an attachment and set the location of the post access the set of buttons on the lower left corner of the social posting box.
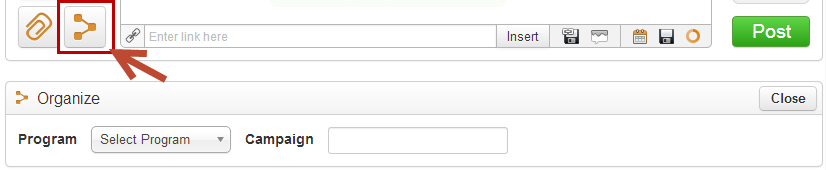
Adding Program/Campaign
Lead Liaison uses Programs and Campaigns to help marketers track effectiveness of their marketing efforts and measure ROI. Programs and Campaigns are discussed in detail here. Lead Liaison will keep track of the First Touch Program and First Touch Campaign if the initial visit to your company's website comes from the visitor clicking a link in your social media post. Lead Liaison also records every touch, not just the First Touch, to give marketers a comprehensive overview of the impact of their marketing efforts. Click the Organize icon to add a Program and Campaign to your social post:
Adding Attachments
To add an attachment to your social post click the Attachment icon (paperclip)

Using Drafts
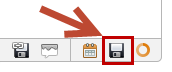
Saving a Draft
To save a draft click the disk icon on the bottom right of the message window as shown in the image below:
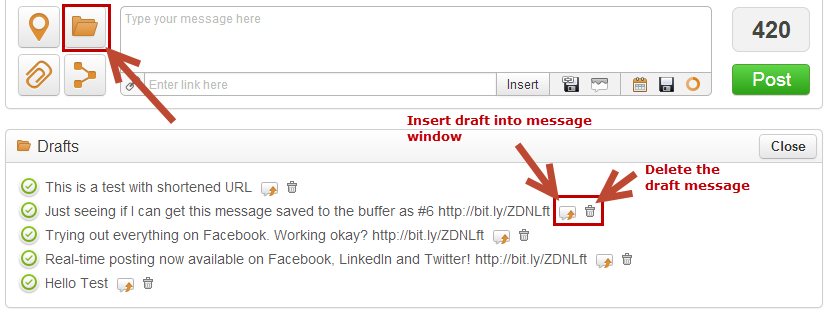
Deleting/Inserting a Draft
Click the draft folder and select the insert icon next to the draft message you want to insert. To delete a draft message click the garbage can icon next to the draft message you want to delete.
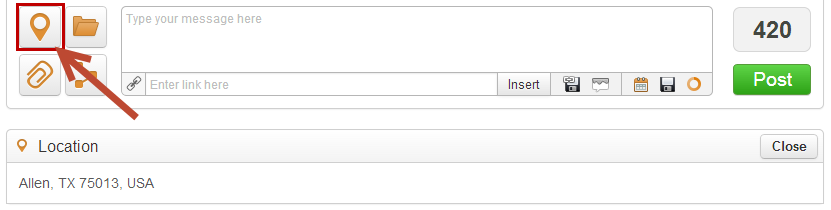
Adding Location
To add a location to the social post click the location icon.
Browser Acceptance
Depending on the browser you are using, you must authorize your browser to allow geolocation tracking. A browser prompt will appear that requires you to allow geolocation. Make sure to do this after adding a location. You may need to refresh your browser window when done.
Advanced Posting Methods
Lead Liaison allows advanced posting methods such as scheduling and buffering. Each method and the process is explained below:
Scheduling Messages
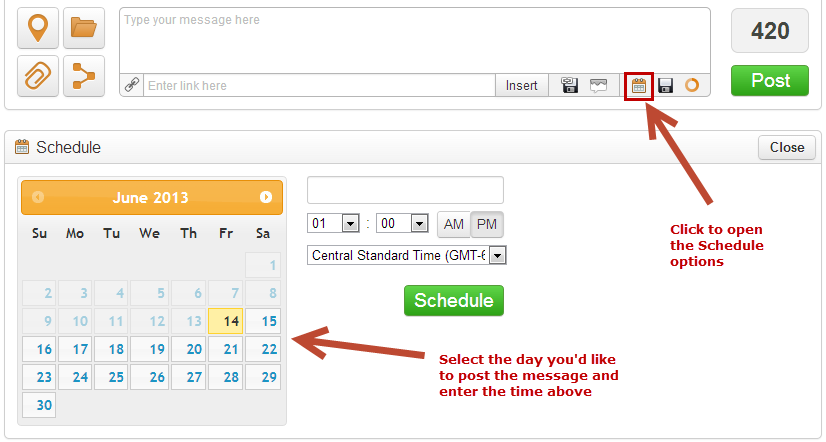
Scheduling social posts is a good way to plan ahead and time social posts with key events or days/times. To schedule a social post do the following:
- Click the schedule icon to open the schedule options box.
- Select a date on the calendar for which you'd like to post your social message.
- Enter a time, select the timezone (defaults to user timezone setting).
- Click the Schedule button
To view your scheduled messages do the following:
- Click Content > Social Posts. Alternatively, you can:
- Click the manage social posts button next to Social Posts on the left-hand menu
- Under the Status column on the top table select "Scheduled" from the drop down

Buffering Messages
Lead Liaison provides an innovative approach to posting social media messages called the "Buffer". The Buffer is like a gas tank. Based on the Buffer Capacity (like 15 gallons in a gas tank) the Buffer will tell the user how low their social message queue is. For example, if the user defines a Buffer Capacity of 100, and there are 50 messages in their queue (note, one post at the same time to multiple social networks only counts as one toward Buffer Capacity), then the Buffer will show 50%. The Buffer is a good way to set social posting on cruise control. To access the Buffer settings and configure your Buffer do the following:
- Click Settings > App Setup > Social > Buffer
Configuring the Buffer
To turn the Buffer on flip the switch! Optionally enable Lead Liaison to notify Admins when the Buffer capacity is low (<10%). The Buffer "tank" is shown in a bar graph at the bottom of the settings section and also on the social post page in the top right corner.

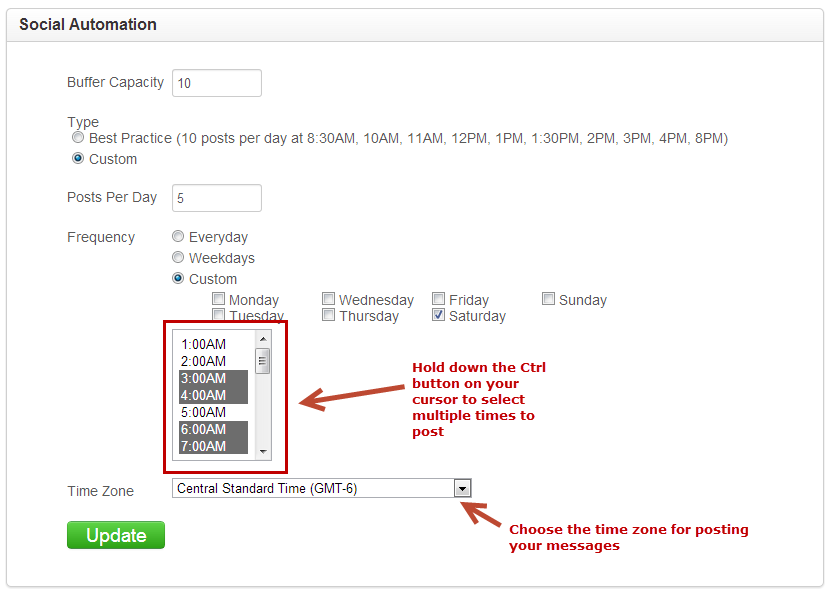
The Social Automation box configures the Buffer capacity, frequency and times for which you want to automate your social posts using your Buffer. Settings are described below:
- Buffer Capacity = Sets the size of your Buffer. It's like establishing the size of the gas tank in your car. Once your Buffer is low an email will be sent to Admins reminding them to fill up the Buffer with more messages.
- Type= Sets the Buffer type, either as a Best Practice or Custom.
- Best Practice = Uses industry best practices for posting 10 social media messages per day at 8:30AM, 10AM, 11AM, 12PM, 1PM, 1:30PM, 2PM, 3PM, 4PM and 8PM according to the Time Zone specified.
- Custom = Uses custom days to post from your Buffer.
- Posts Per Day = Defines how many messages to post per day from your Buffer. Only available in Custom type mode.
- Frequency = Posts everyday, only on weekdays or on custom days specifed in the checkboxes below.
- Time Zone = The time zone for which your messages will be posted on the day/times selected.
Selecting Multiple Times
To select multiple times to post from the Buffer hold down the Ctrl button on your keyboard and select the times from the window with your cursor. Make sure to click the Update button once you've selected your posting times.
Adding Messages to the Buffer
To add a message to your Buffer from the social post page click the orange circle on the bottom right of the message box and click the Post button once you're ready to add it to your Buffer.

Scheduling Buffer Message
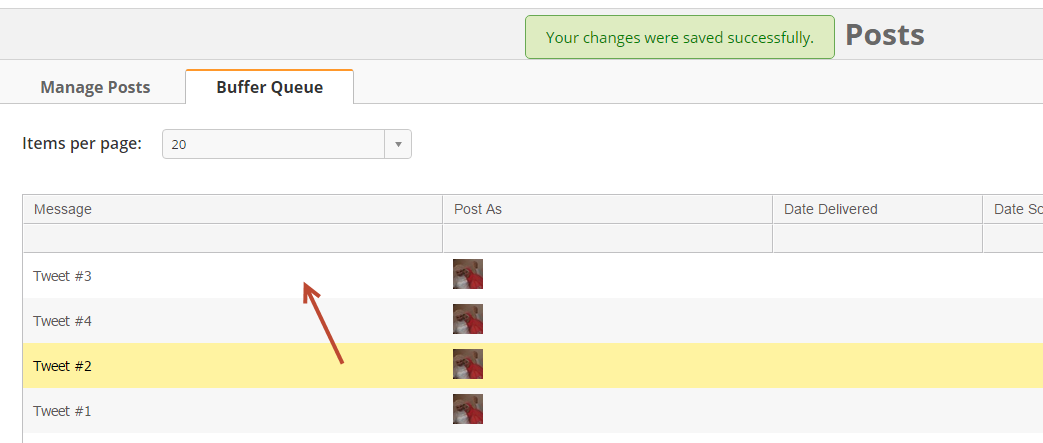
When messages are added to the Buffer they are delivered in the order they appear in the Buffer (messages on top go out first). By default, the Buffer is a FIFO (First In First Out) queue. In other words, older messages will get delivered first. However, the order of message delivery can be changed by dragging/dropping messages in the Buffer Queue. To change the order of message delivery do the following:
- Click Content > Social Posts > Buffer Queue
- Start dragging/dropping!
Buffer Alerts
When the Buffer is low (< 10%) a daily notification email will be sent to every user with Admin rights. The daily notification is sent at 2AM Central time. The notification email looks like this:
First_Name Last_Name,
You are receiving this message since you have administrative rights for your Lead Liaison account. This is a notification from Lead Liaison that your social post buffer is low, you have only 5 messages in the Buffer. Please contact Lead Liaison support at support@leadliaison.com if you need help.
Thanks,
Lead Liaison
Managing Messages
To manage your social posts do the following:
- Click Content > Social Posts
Sorting/Filtering
To sort messages click on any of the column headers. To filter messages start typing in the text field below the header or use the drop down.
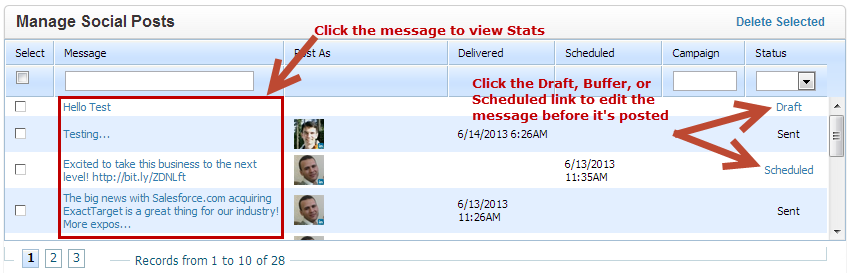
Post As Column
Note, we'll show up to four (4) accounts under the "Post As" section. All accounts used to post the message are shown at the bottom under statistics once the Message itself has been clicked.
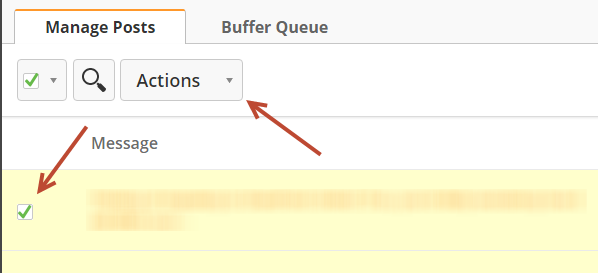
Deleting Scheduled/Buffer/Draft Messages
To delete one or more Scheduled, Buffered or Draft message(s) do the following:
- Click Content > Social Posts
- Select the messages to delete by selecting the respective rows
- Click the Actions button and select Delete
Creating Canned Messages and URLs
A Canned Message is a pre-created message that can be used in a social post. Canned Messages eliminate the need to retype a message every time. Suppose your company is attending a big event, such as a tradeshow, multiple times a month. Instead of retyping the message, insert a Canned Message then modify it to your liking. Similarly, used Canned URLs to re-use links in your social posts.
Tracking of Canned URLs
Canned URLs are not automatically shortened and are not encoded for tracking.
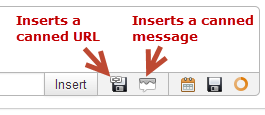
To insert a Canned Message or Canned URL click the Canned Message/URL icon on the social post page:
To create or delete a Canned Message or Canned URL do the following:
- Click Settings > App Setup > Social
- Go to the Canned Messages tab
- Click the Add Message button to insert a new Canned Message/URL
- To delete a Canned Message/URL select the message by checking the check box under the "Select" column then click the "Delete Selected" link a the top of the table
Tracking Social Engagement
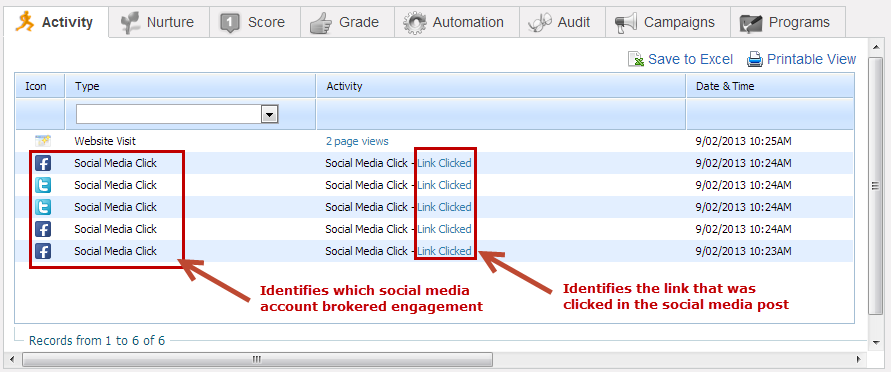
Lead Liaison tracks prospects that engage with your social media posts. Each time a prospect clicks a link in your social media post Lead Liaison records this behavior and adds it to the list of behavioral actions on the person's Prospect Profile (under the Activity tab). Lead Liaison can detect which social media network (Facebook, Twitter, LinkedIn, etc.) the prospect interacted with and record it in the table as shown in the screenshot below. Under the Activity column, click the Link Clicked link to see which link the prospect interacted with.
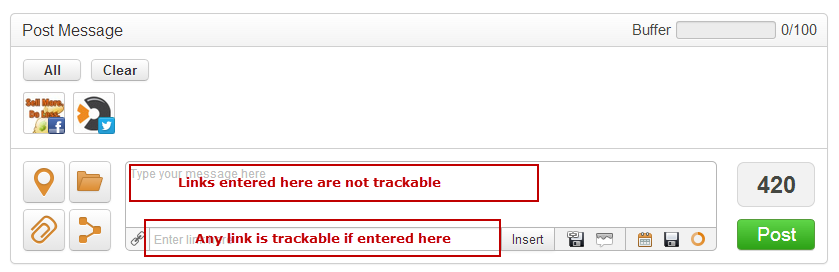
All Links are Trackable - But Must be Inserted Using "Insert"
Lead Liaison makes URLs trackable (records activity history, statistics and memberships) for URLs entered into the "Enter link here" field and after clicking the "Insert" button. Any URL, even 3rd party URLs, are trackable when entered this way. The link does not have to point to your website.
URLs entered into the message body field as shown in the screenshot below and Canned URLs are not converted to trackable URLs.
Here's a description of the process Lead Liaison takes to make a link trackable:
- Consider a shortened link, such as http://tno.n/blah, entered into the "Enter link here" field
- The link is converted into something like http://app.leadliaison.com/link-redirect.php?social_post_id=xyz. This is the "Link Redirect URL".
- The link will then be shortened into a bit.ly URL, something like: http://bit.ly/uniquecode
- The bit.ly URL is what is shown in the social post message and what is clicked by visitors
Lead Liaison process for tracking engagement:
- The visitor clicks the bit.ly URL
- The visitor is redirected to Lead Liaison's backend to the Link Redirect URL
- The Link Redirect URL is responsible for identifying the visitor and tracking their online behavior (reads existing Lead Liaison cookies or sets a new cookie if one does not exist and records the activity history). The time the browser stays on the Link Redirect URL page is very brief and usually goes unnoticed by the visitor.
- The visitor is redirected to the original http://tno.n/blah URL
- The original URL shortening service (in this case tno.n) will redirect the visitor to the page that the short URL, http://tno.n/blah, is pointed to
Things to keep in mind when tracking social media activity:
- When someone clicks a link in social media Lead Liaison will:
- Record a "Social Media Click" on the person's profile
- Score the event according to your baseline lead scoring rules
- Identify the Prospect's visit to your website and track all other activity
- Keep the person anonymous until they identify themselves
- When someone clicks a link in social media Lead Liaison will not:
- Automatically identify the person
- The link must be a bit.ly link, shortened by Lead Liaison, by using the "Insert" button to insert the hyperlink. If the link is added to the social post and not shortened (http://www.yourdomain.com) a link click will not be scored and the behavior will not be tracked.
Scoring Social Engagement
When a prospect interacts with your social media post Lead Liaison can automatically score them. To modify the lead score for this activity simply go to the out of the box lead scoring rules and set the value for Social Post Click as shown here.
Analyzing Messages (Statistics)
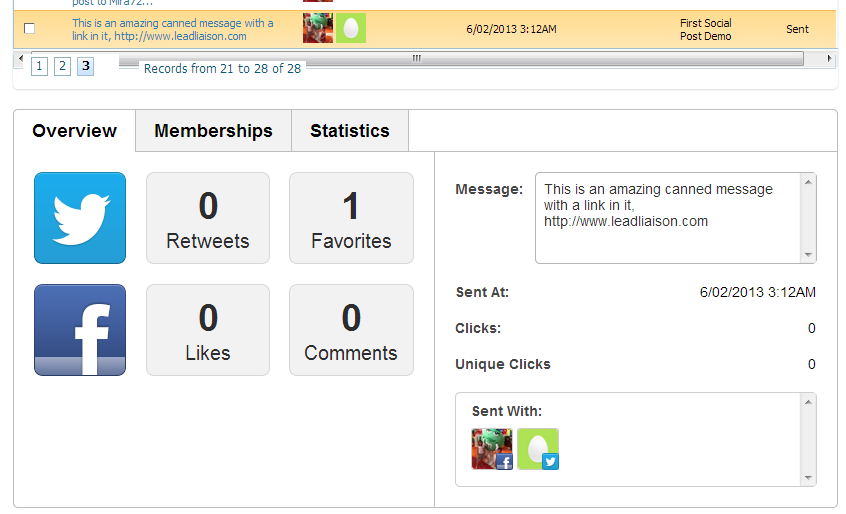
Lead Liaison provides detailed stats on your social posts. Click on any message in the Manage Social Posts section to see stats for the individual message. Three tabs are available to keep your stats organized.
- Overview = Provides Twitter Retweets and Favorites and Facebook Likes and Comments for the message.
- Memberships = Tracks known users who have clicked your social media message.
- Statistics= Tracks the original link (before encoding), who posted the message, Clicks (total clicks) and Unique Clicks.
Original Link = The original link (before conversion to bit.ly) that was clicked in the Social Post. For example, there could be 3 total links in the Social Post. If one person clicked all three links then there would be three rows with the three links displayed.
Posted As = The account which was used (host) when the prospect clicked the link.
Total Clicks = Total number of clicks on the link through the specific Posted As account.
Unique Clicks = Number total link clicks that are unique through the specific Posted As account. For example, if someone clicked the same link twice it would count as 2 clicks but only one unique click.
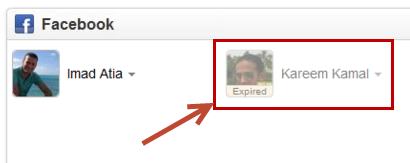
Expired Accounts
A message will be sent to all social media accounts which have expired. An expired account is an account that cannot connect to Lead Liaison any longer. For example, if your password on your LinkedIn account changes and the password is not updated in Lead Liaison then Lead Liaison would trigger an expiration notification for the respective LinkedIn account.
Facebook and LinkedIn Account Expiration
Facebook and LinkedIn automatically expire their tokens every 2 months. Each Facebook/LinkedIn account will need to be re-authenticated after two months. This is a limitation imposed by Facebook and LinkedIn and not Lead Liaison.
The message sent to users and Admins will look similar to the one below. Here are a few other highlights of notifications for expired accounts:
- Messages are sent at 4AM Central time.
- In addition to Expired accounts, Lead Liaison provides advance notice for Facebook account expiration. Notifications will be sent 7 days and 1 day before an account is about to expire. There is no advance notice with expired LinkedIn accounts.
- Twitter accounts do not expire; however, under some circumstances they may. If a Twitter account does expire then Lead Liaison will mark the account as expired and send the notification emails.
- Messages sent for Expired accounts are sent only once.
- If an account is expired and a social message post is attempted a message similar to the one below will be sent to the user of the expired account as well as the admins.
user,
We wanted to let you know that the Facebook account, Your Account, you added to Lead Liaison has expired. Until you re-authenticate this account from within Lead Liaison messages will not be posted to this account. Please follow the directions below to re-authenticate this account:
For Facebook Accounts Added by Admins:
Login to Lead Liaison at https://app.leadliaison.com/login.php and go to Administration > Connectors and look for the Facebook section. Click the account to re-authenticate. In the drop down menu that appears select "re-authenticate" and follow the prompts.
For Facebook Accounts Added by Users:
Login to Lead Liaison at https://app.leadliaison.com/login.php and go to Setup > 3rd Party and look for the Facebook section. Click the account to re-authenticate. In the drop down menu that appears select "re-authenticate" and follow the prompts.
Regards,
Lead Liaison
Need sales leads? Let Lead Liaison work for you!
Your lead liaison!
Go on, check us out:
http://www.leadliason.com
info-ll@leadliaison.com
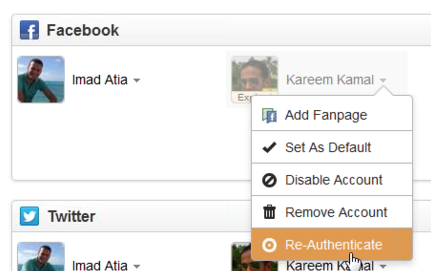
Follow the directions below to Re-Authenticate an account:
- For Facebook Accounts Added by Admins:
- Go to Settings > Integrations > Connectors
- Find the Expired account
- Click the account and select Re-Authenticate
- For Facebook Accounts Added by Users:
- Go to Home > 3rd Party
- Find the Expired account
- Click the account and select Re-Authenticate
LinkedIn Posting
This section describes the experience when posting on LinkedIn to both personal and company accounts.
Posting Plain Text Messages
In this case, the user posts a plain text message with no links or attachments.
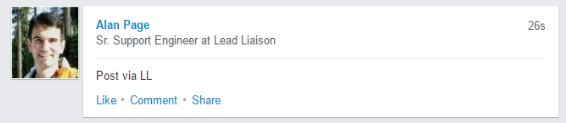
Personal Accounts:
- Posts will show up with plain text, in this case "Post via LL".
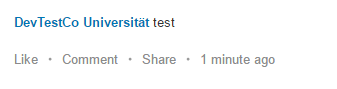
Company Accounts:
- Posts will show up with plain text, in this case "test".
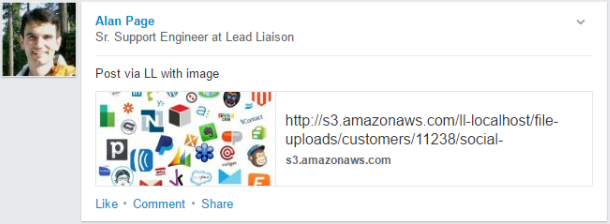
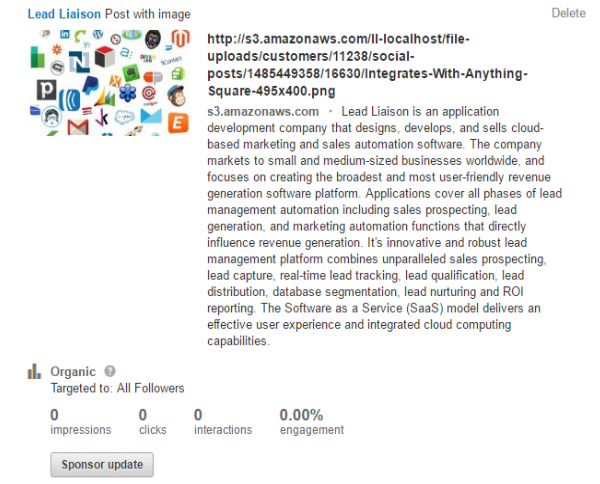
Posting Plain Text with Image Attachments
In this case, the user posts a text message and attaches an image to the post.
Personal Accounts:
- Posts will show up with plain text, in this case "Post via LL with image".
- The image will be shown in the image preview box.
- The image URL and image domain will be shown to the right.
Company Accounts:
- Posts will show up with plain text, in this case "Post with image".
- The image will be shown in the image preview box.
- The image URL and image domain will be shown to the right.
- A description of the company will be shown to the right at the bottom.
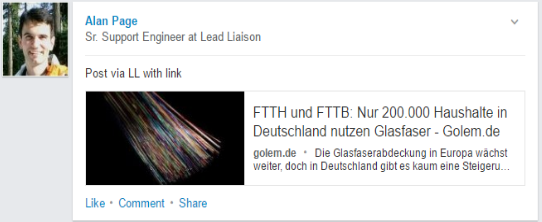
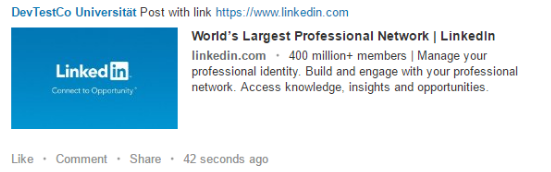
Posting Text with a Link
In this case, the user types some text and links part of the text.
Personal Accounts:
- LinkedIn removes the link and uses the image preview from the link URL.
Company Accounts:
- LinkedIn keeps the link and uses the image preview from the link URL.
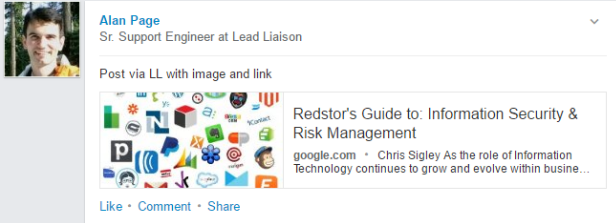
Posting with an Image Attachment and a Link
In this case, the user links text in their message and attaches an image to the post.
Personal Accounts:
- LinkedIn removes the link, uses the attached image in the preview, and the text from the link.
Company Accounts:
- LinkedIn removes the link, uses the attached image in the preview, and the text from the link.

![]()
© 2021 Lead Liaison, LLC. All rights reserved.
13101 Preston Road Ste 110 – 159 Dallas, TX 75240 | T 888.895.3237 | F 630.566.8107 www.leadliaison.com | Privacy Policy